Wednesday, October 20, 2010

Omelette Dinner for One

Due to the nature of his job, there are times when the husband travels. And during those times, I'm extraordinarily tempted to just order a pizza and nosh on it for three consecutive dinners. But I can't do that anymore. As tempting as pizza is to me (and hoo boy do I LOVE pizza), I haven't straightened out my eating habits for the past three months only to blow it because I can't control myself for one meal.

So, I've come to just craft some singles-only dinners from whatever is sitting in the fridge at any given time. Tonight, that dinner became an omelette. An omelette is one of those things I never made before, and when I did, I thought, "Well that was way too easy and tasty." And it really is very, very easy.

The basis of any good omelette is fresh eggs (I use local eggs, of course), salt, pepper, a well-buttered and nonstick skillet, and a low heat. That last bit is the most important. It's tempting to just whip up some eggs and throw them on high heat to cook quickly, but cooking the hell out of something like an egg is just not (in the words of Alton Brown) good eats.

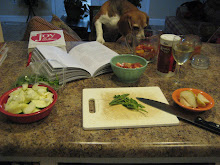
My omelette preparation: crack open 3 eggs in a medium bowl. Add about 1 Tbsp. milk (this will ensure a fluffy omelette) and salt and pepper to taste. Whisk together and set aside. In a nonstick skillet, heat about 1 Tbsp. butter (again, I use farm fresh butter here) over low heat, turning the skillet around as the butter heats to coat the sides and bottom evenly and prevent sticking.

Pour the egg mixture into the skillet and let sit over low/medium-low heat for...well, I don't time mine. I go by looks alone here. You can tell when the egg is starting to set as it gets fluffier around the edges and takes on a darker look and begins to ever so slightly bubble in the middle. When it reaches this consistency, take a rubber spatula and run it gently around the edges of the omelette just to loosen it up a bit. The next part really depends on your level of taste in omelettes. I prefer a runnier middle, so after I've loosened up the edges and still have a runny consistency on the top of the omelette, I add cheese sprinkled down the center of the omelette (it was organic cheddar cheese tonight, but you could use Gruyere, provolone, Swiss...really anything you have on hand) to melt slightly. (If you like your omelette more done, go ahead and sprinkle on the cheese to melt, but you'll have to wait a while for the center to set perfectly--during that time, do not be tempted to turn up the heat.)

Next, I add my meats, veggies, etc. The great thing about an omelette is that you really can't go wrong with your fillings of choice. My filling of choice tonight was leftover roasted broccoli. But you could use onions, peppers, tomatoes, whatever your heart desires. Just sprinkle down the center, then take your spatula and flip one corner of the omelette over, pressing down slightly, followed by the other corner. (You should note that, if you really like a set omelette, this part isn't going to be pretty. Because the consistency is set, when you go to turn in the corners of your omelette, it is going to split, and you run the risk of your fillings spilling out into the skillet.) Then just slide gently onto a plate. Now, I prefer to add diced tomatoes at the end, but that's just me. And for those who enjoy some heat, Tabasco sauce makes a great complement for an omelette.


My side tonight was quick, sauteed potatoes. Seriously, I can't believe how long I've gone without making potatoes this way. I've always had trouble reconciling a crispy exterior to a soft interior when sautéing potatoes raw, but this little trick saves a ton of time and fretting. Just take a potato (I use new potatoes), stab it a few times with a fork just to ensure it doesn't build up pressure and explode in the microwave, and microwave for about 2.5 minutes. Carefully remove the potato (I generally use one per person), and, using a paper towel to hold it in place (and to keep your fingers from getting scorched), slice into about 3/4" discs, sprinkle with salt and pepper, and saute in olive oil over medium heat until lightly brown on the outside. It takes no time at all, and the texture is perfection.

Monday, October 4, 2010

Jamaican Jerk Chicken

The great thing about shopping at the farmer's market now instead of at the grocery store is the abundance of fresh meats. We already have a freezer well stocked by Shadowchase Farm, but we tend to eat chicken the most. And god, what a difference fresh poultry makes. It's a bit pricier (a 3.5-pound bird will run around $12 in this area), but the quality is well worth it (imagine that). Because we've cut back on meat consumption across the board, my usual plan of action is to just get up early enough to make it to the market by 8 a.m. on a Saturday to ensure I get a chicken if we need one for the week or two ahead. Our poultry choice is Weathertop Farm.


And no, you can't have the convenience of picking up a few pieces of a chicken (say, the breast or thighs as you would in the grocery store). But who cares? Part of the joy of cooking, to me, is getting to really experience the food. And while the thought of actually killing a chicken isn't something I want to do anytime soon, I feel better honing my chicken cutting skills than I would just picking up a hormone-filled piece of chicken packed on a piece of styrofoam and complete with one of those hideous chicken diaper things--you know, the white plastic thing that is placed under the cut of meat for some reason I've never really wanted to explore. (By the way, those "chickens" in the grocery store? During their short lifetime they have been packed to the rafters in the tiniest spaces imaginable and pumped full of hormones to stimulate the growth of huge breasts--basically the poultry equivalent of breast implants. Which means they grow so quickly that they're legs are rendered useless, so they eventually cannot support their own weight. Also? They're fed antibiotics to combat the plethora of diseases running rampant in those "living" conditions, and even still we're exposed to salmonella from chicken available in the grocery store. And for what? The sake of convenience and a cheaper grocery bill? You know what? I'll gladly take that $12 bird from the farmer's market that renders me eight good pieces of meat, a carcass for homemade chicken stock, and the knowledge that my bird had a good life, raised in the open pasture and allowed to be a chicken. I don't understand anymore those who choose to ignore what they eat because it's easier. I really don't want to pay your healthcare costs, thankyouverymuch.)


Stepping off the soap box....anyway. Yeah, Jamaican jerk chicken. That's the recipe I decided to use for my fresh chicken this particular day. I've started to drift more toward my Joy of Cooking cookbook for recipes and inspiration, and this is where the jerk paste recipe for the chicken was found.


So, Jamaican Jerk Paste:
1/3 c. fresh lime juice
10 habanero peppers (or 1/4 c. habanero-based hot sauce)
2 Tbsp. distilled white vinegar
3 scallions, coarsely chopped
2 Tbsp. dried basil
2 Tbsp. dried thyme
2 Tbsp. yellow mustard seeds or 1 Tbsp. dry mustard
2 tsp. ground allspice
1 tsp. ground cloves
1 tsp. salt
1 tsp. black pepper


Combine all ingredients in a food processor and puree. I omitted the scallions and subbed in the habanero-based hot sauce. This is a really nice, spicy blend (the allspice particularly stands out). I do wish I had gone with the raw habaneros, because it wasn't spicy enough. Anyway, I just brushed the paste mix on the cut chicken pieces and grilled on medium heat until done, basting with the leftover paste along the way.


It's important to note that, because fresh chicken isn't pumped full of god knows what, the cooking time is quicker. Therefore, I opt to go with the low and slow way of cooking when using fresh, locally raised meats. It's worth the time.


You can always brine fresh chicken as well to lock in the moisture--just do a simple Google search, and you'll find an encyclopedia of information and recipes, which usually just include a simple mix of water, sugar, and salt.


I'll get to the sides next: just some grilled new potatoes (again, from the farmer's market) and Asian pears.  Pears are pretty prevalent right now as it's their season to shine, so I just picked up a few and made a simple honey vinaigrette to drizzle over them (seriously simple--just combine some honey and lime to taste).


Now, I'm going to step back to the chicken. I'm still no expert at cutting a whole chicken efficiently, but I wanted to share a video that I've found is a great resource for some cutting tips. Yes, it's Gordon Ramsay, but he's helpful--he's not yelling. And again, if you're so inclined as I am, you can easily save the carcass and neck (yep, my fresh chicken comes complete with the neck, which you just have to lop off if it's there) in a Ziploc bag and freeze for future use in stocks. Voila--despite the initial cost, a fresh chicken can yield several uses.