Sunday, January 31, 2010

Lemon Pasta, or a Disciple of the Church of the Flying Spaghetti Monster

Whenever I fix something I've just thrown together without the use of a cookbook, my husband stares at me like he's just discovered Big Foot. It's true that I'm much more comfortable using a recipe, but this one I've had in my back pocket for a while.

Lemon Pasta, which is bearing an uncanny resemblance to the Flying Spaghetti Monster.

It's a Lemon Pasta, which just consists of linguine (fixed per instructions on the box) tossed with pasta water (just extract a few tablespoons of the water in which the pasta boiled before draining), lemon zest, fresh lemon juice, Parmesan cheese, and salt to taste. If the pasta needs a bit more moisture, just drizzle in some olive oil.

I served the pasta with fried polenta (just buy some pre-made polenta in tube form, usually found in the organic section of the grocery store, and slice about 1/2-inch thick) topped with a tangy tomato sauce (heat some olive oil on medium-low in a saucepan and saute about 1 cup chopped onions and 1 clove minced garlic for about 5 minutes, then add about three chopped tomatoes, 1 Tbsp. dried basil, 1 tsp. oregano, 1/4 tsp. salt, and 1 tsp. Tabasco; reduce heat and simmer for 20 minutes).


A final side was just a bagged salad tossed with chopped walnuts, goat cheese, and diced tomatoes.

The Ultimate Roast Chicken, Julia Child-Style

I'm two days behind on posting because there were two new meals this weekend. (Okay, mainly because I become extremely lazy when snowed in.) Because of that, I'm breaking this into two separate posts, because this one will take a while.

First up is Julia Child's Poulet Roti (or Roast Chicken), which comes from Volume 1 of "Mastering the Art of French Cooking." I have been unable to find this recipe online, so it's transcribed below. Anyone familiar with "Mastering" will understand that the ingredients and instructions are not laid out as is "normal" in other cookbooks. The recipes, instead, are laid out in two columns, with ingredients when needed listed on the left side and the cooking steps listed on the right-hand side. Therefore, without the capability to divide this blog into two columns, I'm going to do my best to represent the recipe by listing the ingredients and their corresponding directions, step-by-step, instead of providing all of the ingredients upfront. The only (because I think it's a sin to adjust any of Julia's recipes) addition to this I make is more carrots and onions, because I think the resulting vegetables are amazing (they're drenched in butter and oil--how could that not be freakin' awesome?!). I bought a 4.8-pound chicken (see a previous post about prepping a whole chicken for roasting), and total roasting time was approximately 1 hour and 40 minutes.

This recipe has been used so many times that the page has become naturally marked in the book and is spattered with butter. Most novice cooks (even some that have been cooking for years) can become intimidated by Julia Child's recipes, but they are surprisingly simple once you start. The key to French food, as they say, is mostly a copious amount of butter. For such a simple ingredient, it yields delicious results if you take the time to follow the recipe.


So, here goes:

Preheat oven to 425 degrees.

A roasting chicken (at least three pounds, which will take about 1 hour and 10-20 minutes of roasting time)
1/4 tsp salt
2 Tbsp. softened butter
-Sprinkle the inside of the chicken with the salt and smear in half the butter. Truss the chicken (there are various sites that illustrate this process; I skip it, and the chicken turns out perfectly just the same). Dry it thoroughly, and rub the skin with the rest of the butter. (It's essential that the butter and the chicken are at room temperature; I know from experience that trying to butter a cold chicken is nearly impossible.)

A shallow roasting pan just large enough to hold the chicken easily
A small sliced carrot and onion
Small saucepan containing 2 Tbsp. melted butter and 1 Tbsp. good cooking oil; a basting brush
-Place the chicken breast up in the roasting pan. Strew the vegetables around it, and set it on a rack in the middle of the preheated oven. Allow the chicken to brown lightly for 15 minutes, turning it on the left side after 5 minutes, on the right side for the last 5 minutes, and basting it with the butter and oil after each turn. Baste rapidly, so oven does not cool off. Reduce oven to 350 degrees. Leave the chicken on its side, and baste every 8 to 10 minutes, using the fat in the roasting pan when the butter and oil are exhausted. Regulate oven heat so chicken is making cooking noises, but fat is not burning.

1/4 tsp. salt
-Halfway through estimated roasting time, salt the chicken and turn it on its other side. Continue basting.

1/4 tsp. salt
-Fifteen minutes before end of estimated roasting time, salt again and turn the chicken breast up. Continue basting.

Indications that the chicken is almost done are: a sudden rain of splutters in the oven, a swelling of the breast and slight puff of the skin, the drumstick is tender when pressed and can be moved in its socket. To check further, prick the thickest part of the drumstick with a fork. Its juices should run clear yellow. As a final check, lift the chicken and drain the juices from its vent. If the last drops are clear yellow, the chicken is definitely done. If not, roast another 5 minutes, and test again.

When done, discard trussing strings (if applicable) and set the chicken on a hot platter. It should sit at room temperature for 5 to 10 minutes before being carved, so its juices will retreat back into the tissues.

1/2 Tbsp. minced shallot or green onion
1 c. brown chicken stock, canned chicken broth, or beef bouillon
Salt and pepper
1 to 2 Tbsp. softened butter
-Remove all but two tablespoons of fat from the pan. Stir in the minced shallot or onion and cook slowly for 1 minute. Add the stock and boil rapidly over high heat, scraping up coagulated roasting juices with a wooden spoon and letting liquid reduce to about 1/2 cup. Season with salt and pepper. Off heat and just before serving, swirl in the enrichment butter by bits until it has been absorbed. Pour a spoonful of the sauce over the chicken, and send the rest to the table.


Now, I normally serve the roast chicken with either fried potatoes and/or roasted tomatoes. But this night, I decided to go for something a little different. For some reason, I wanted to give beets a shot, so I found a Roasted Beet Salad. And all I can say is...eh. Not a big fan of the beets. If you are, this may be right up your alley.


We finished off the meal with Chocolate-Cherry Smart Heart Cookies. I love to bake (it was my first introduction to cooking overall), but I don't bake as much now as I used to as a single gal, mainly because the husband and I have no willpower, so baked goods tend to disappear quicker than they should. I subbed out dried cranberries for this recipe, and it's not bad. I'm not a big fan of chocolate (yeah, I know, it's practically a cardinal sin to some), but the bittersweet type in this was subtle. A great alternative to chocolate chip cookies.

Friday, January 29, 2010

Miami Burger

Since Mother Nature is supposed to dump another foot of snow in our area tonight, a "Miami Burger" seemed like a tasty option for dinner.


If you're familiar with a Cuban sandwich, the foundation for this burger has those basic components: Swiss cheese, smoked ham, a mayo and mustard spread, and dill pickles. Except the usual meat (normally a sliced herbed pork loin) is subbed out here with ground chuck. We're big fans of the traditional Cuban sandwich, and we've tried variations, but this one is close to topping the list. It's simple, especially if you have a grill pan. Not many changes in the recipe here. I didn't have enough time to roast garlic (which normally takes about 30 minutes), so I sprinkled some garlic powder into the mayo, and it worked just as well. Be careful when you assemble the sandwich and place it on the grill--it has a tendency to slip apart, so just take your time when flipping around the pan.

Sides included baked beans (tonight this was just a matter of dumping a can of Bushed baked beans into a saucepan, although I'm not above admitting they're some of my favorite baked beans) and sweet potato fries. The latter is super easy--just cut sweet potatoes or yams (whatever is available in  your local grocery store) into sticks, toss with canola oil, sprinkle with cinnamon, and bake at 425 degrees for 20-25 minutes, flipping once about halfway through baking time. When finished, spray a little cooking spray over the fries and sprinkle with sugar (the spray will help adhere the sugar to the fries). Alternately, you can make a savory version using a sprinkling of salt and pepper instead of the cinnamon and sugar. But I prefer the sweet version. And note to self (and others interested in making some baked fries of any kind at home): I mentioned high and low smoking points for different oils in an earlier post, and I haven't been following my own advice. I normally toss the matchstick potatoes with extra virgin olive oil, but I learned tonight that tossing with canola oil (which, again, has a higher smoking point) produces better results when baking at a high temperature. Lesson learned. Especially since using canola oil tonight didn't set off our ultra-sensitive smoke detector, resulting in all of my 5'5" height trying to jump up and hit just the right button to turn off that horrible noise while my 6'4" husband watches.

So, that's it for tonight. Stay tuned in a day or so for Julia Child's roasted chicken....

Tuesday, January 26, 2010

Quick Meals

Whenever my husband is out of town, I'm not as enthused about cooking. Okay, truth be told, whenever my husband is out of town, I'm always tempted by the simplicity of ordering a pizza. But, because I'm trying to eat a little healthier, I managed to force myself to drive straight home after work (because hey, it's snowing--don't you know you're not supposed to be out in that stuff?!) and start on dinner. Nothing new here--I rehashed the Roasted Chicken with Balsamic Peppers (except I was fresh out of peppers, or even roasted peppers in a jar, so I just stuck with the shallots, rosemary and broth as a topper; and I totally just remembered I forgot to add the balsamic vinegar). This is, as I mentioned in the original post, a relatively simple dish packed with flavor.

Another idea for a quick fix for a weeknight meal, weekend lunch, or as a general amazing alternative to a grilled cheese if you need a "comfort" sandwich, is a Monte Cristo. We use real eggs, mainly because I find egg substitute to be as bland as bland can be. We also use as a dipping sauce either a jam (raspberry, blackberry) or we've had a great version served with warmed maple syrup (actual maple syrup, not the goopy, thick stuff in the bottle). It's like a savory-stuffed French toast--simple, but terrific.

Sunday, January 24, 2010

Pot Roast!

I think anytime we decide to make pot roast for dinner, it's followed by an exclamation point. "Do you want POT ROAST! tonight?" "We're having POT ROAST!" It's a lot of exultation for something that's fairly simple to make.


Normally, I follow this recipe, but I decided to try an Old-Fashioned Pot Roast recipe from a well used cookbook called Bon Appetit, Y'all, a Southern take on traditional French food. Below is the recipe, with my notes in parentheses:

--3 Tbsp. canola oil (This is really essential to this recipe, because you want an oil with a high smoking point, which means it can be set at a substantial temperature and not burn; extra virgin olive oil has a low smoking point, so it would no be well suited for this recipe)
--1 (4-pound) boneless chuck roast or rump roast (You can buy one on the shelf in your grocery store, but if you can get some fresh from the butcher, it makes a difference in the taste)
--3 medium onions, thickly sliced
--1 c. dry red wine (The rule of thumb when cooking with wine is to use something you would drink; it doesn't have to be an expensive wine)
--2 Tbsp. paprika
--2 tsp. chopped fresh thyme (If you only have dried thyme on hand, use less--dried herbs are much stronger in taste than fresh herbs)
--4 garlic cloves, crushed
--3 c. beef stock
--6 carrots, cut in 1.5-inch thick pieces
--Coarse salt and freshly ground black pepper

Preheat the oven to 300 degrees Fahrenheit. To cook the roast, in a large heavy bottomed Dutch oven (one of my essential pieces of kitchen equipment; it's pricey, but a Dutch oven is well worth the investment), heat the oil over high heat. (I'm not sure why no seasoning of the meat is included here, because it will need it. So, while heating the oil, I seasoned the roast liberally with salt and pepper on all sides.) Sear the meat (this is the key to a great pot roast; searing at a high temperature and quickly will seal in the juices, making for a very tender meat in the end) until it is a rich, dark brown on both sides, 8-10 (it took me about 15) minutes total. Remove the meat to a plate.

Decrease the heat to medium, add the onions and cook, stirring frequently, until a deep golden brown, 8-10 minutes. Add the wine and cook, stirring to loosen any brown bits. Add the paprika, thyme, and garlic. Stir to combine and cook until fragrant, 45-60 seconds. Return the seared roast to the pan. Add the stock and bring to a boil over medium-high heat. Cover and bake in the oven for 1 hour.

Remove from the oven and turn the roast in the liquid to moisten. Add the carrots, cover, and bake an additional 1 to 1.5 hours, or until the meat and carrots are tender.

Transfer the roast to a warm platter. Using a slotted spoon, place the vegetables around the roast. Cover the platter loosely with aluminum foil to keep the food warm. If the sauce is too thin, bring to a boil over high heat to reduce and thicken (I also added a little flour and butter, or what is usually called a roux, to speed up the thickening process). If the sauce is too thick, add a little wine or stock to achieve the correct consistency. Taste the sauce and adjust using salt and pepper.

To serve, slice the roast against the grain and spoon the sauce over the roast and vegetables.

I served the POT ROAST! with roasted broccoli. I originally intended to do a steamed broccoli side, but I happened to catch an episode of Barefoot Contessa on Food Network in which she fixed roasted broccoli. To do this, just toss some fresh broccoli florets with salt, pepper, and olive oil. Roast at 425 degrees for about 20-25 minutes. I topped the broccoli with grated fresh Parmesan, toasted walnuts (toasting nuts brings out their essential oils and gives them a more "complex" taste), and bacon that I fixed and crumbled while roasting the broccoli. You can also add fresh lemon juice and zest, green onions, almonds--really whatever you want to use. I found the roasted broccoli on its own to be a bit bitter, so the additional toppings vastly improved the taste.


Another quick side was leftover bread from last night's dinner.

If there is one dessert I can't resist (okay, three if you count lemon/lime-based desserts and tiramisu), it's a berry dessert. I made some stewed berries during a summer trip to the beach and found it to be a quick and delicious dessert. I just topped tonight's batch with homemade whipped cream, but it's also great drizzled over a pound cake or angel food cake.


Saturday, January 23, 2010

Shrimp Fra Diavolo

One of my favorite foods is shrimp. Right next to pizza, I think it's one of the most versatile foods around. So versatile that, when we decide that we want shrimp for dinner, it normally takes about an hour for me to decide which recipe to try out. Tonight we went for Shrimp Fra Diavolo, a recipe from Cooking Light.


The recipe is easy enough, but I added more salt (as always). Personally, I think it's close to a sin NOT to salt boiling water in preparation for pasta. I also always add a drop or two of olive oil to the boiling water to prevent the pasta from sticking together. For the recipe, I found it best to time the pasta cooking time in sync with the tomato sauce prep to avoid letting the pasta sit in cooling water for a lengthy amount of time.

To accompany the pasta dish, I made a salad using bagged mixed greens, sliced pears, a few crumbles of goat cheese, chopped walnuts, and thinly sliced shallots. As a dressing I made a quick lemon-shallot vinaigrette:
1.5-2 Tbsp. fresh lemon juice
1 tsp. thinly sliced shallot
2-3 Tbsp. olive oil
Sugar to taste
Whisk all ingredients together. Add more olive oil if you want a thicker consistency.


Finally, I picked up a loaf of crusty white bread to top the meal (I'm a sucker for anything made with dough).

And straight from yesterday's trip to a local bakery:


Hello, lover.

Friday, January 22, 2010

Chili and Fries (not to be confused with Chili Fries)

Oh my god, the amount of chili in this house is a little overwhelming. That batch I made the other night, when my husband was out of town and an hour-or-so-long cooking session sounded just right, and hey, I could eat the leftovers the next day? It's still there. The leftovers from the original cooking night had to be distributed between two large containers, one of which I managed to finish myself. The other which had to be delved into tonight. But no matter--it's been icy and gray here, so chili seems to fit the occasion. Even if it is going on two days of straight chili consumption for me.

Normally my heavenly cornbread serves as a side for a batch of chili, but since I had plenty of Yukon gold potatoes leftover from my mashed potato exploration, I decided to make a batch of baked fries. And I swear--in fact, I can almost guarantee--that you will love these. You will love these much better than those yellow sticks you get at the drive-thru. For years, I absentmindedly ate those glistening sticks of what I assume were once potatoes. I nom, nom, nommed them away, ignoring the under-salting, the over-salting, the sagginess. Fries were supposed to taste that way, right? Yeah, not so much.

And these baked fries are so, so simple. Not as simple as letting Mr. McDonald stick a batch of potato lumps into a deep fryer and letting the cooking oil suck the living daylight out of what used to be a vegetable. But simple enough. In fact, I've covered this recipe in an earlier post. But I never went into how much I freakin' love these things. No other fry measures up to it now. It's the perfect blend of soft and crispy, of seasonings, of fresh taste. And hey, it looks like a potato, not some mutant version of its former self.

In the original post, I mentioned the use of russet potatoes. This recipe also works well with new potatoes, fingerling potatoes...whatever you want to use, and in whatever way you choose to slice or cube it. But again, I prefer Yukon gold. Just cut, coat in olive oil, salt, pepper, season/herb (I used fresh thyme this go-round), and pop into the oven. It's 20 minutes baking time total.

I didn't snap any pictures of dinner, because there are only so many times you can take a picture of chili, but I did get some pics of the best part of dinner tonight: dessert. Every once in a blue moon, I make a quick five-minute trip from work to a local bakery: Our Daily Bread. Now owned by a French pastry chef, the bakery is very inconspicuous (as far as I know, the official name of the bakery isn't even visible in the little shopping center in which it's located). Surrounded by CVS, a Curves, some random electronics store, it's a happy little surprise every time I walk in the door. You can check out their options online, but I went for a tiramisu, a "berry"-misu, and a classic eclair today. The eclair was saved for tomorrow, but the others were scarfed down in no time.


Thursday, January 21, 2010

NYSD Dining

Tonight was leftover chili. Normally I post a staple recipe in our household in lieu of a new dinner, but tonight (mainly because I'm unbelievably lazy), I'm sharing a favorite site. At my last job, a co-worker would send what we came to call "food porn," a little culinary break for the day. My favorite snippets were from New York Social Diary's Dining ("bits and morsels") section. It's perfect--just a few descriptive words, a little backstory, and loads of food pictures. And the pictures were, and still are, what make it so much fun. No food styling, nothing fancy--it's just someone with a nice camera taking a picture of food as it is, sometimes with teeth marks in it. So you know it's from the perspective of someone who genuinely enjoys food. There are pictures of foie gras, then grilled cheese, pate to tater tots. It's like a little present every week (the site is usually updated on Wednesdays). And if you're a fan of trips to NYC like I am, then you'll practically covet these little segments. For more tasty treats, click on the Archives link below the masthead and find the Dining section.

Without further ado:
http://www.newyorksocialdiary.com/nysd/dining

Wednesday, January 20, 2010

"Wait for It" Chili

I received this recipe from a co-worker, who labeled it "Wait for It Chili" because the heat of this kind of creeps up on you. Except I have a cold, so I'm pretty sure I dumped copious amounts of heat inducers into this in order to taste anything, so I'm going to include the base heat levels of this recipe (you know, 6 dashes of hot sauce instead of the 1/4 cup I added tonight).


1-2 Tbsp. olive oil
1 red onion, diced
3 garlic cloves, minced
2-3 lb. ground beef
1 tsp. Worcestershire sauce
52 oz. Bush's mild chili beans
56 oz. crushed and/or diced tomatoes, lightly drained (a combo of the two if you like a chunkier chili)
1 red pepper, diced
1 green pepper, diced
2 Tbsp. chili powder
2 tsp. garlic powder
1 tsp. cumin
1 Tbsp. oregano
1/2 tsp. basil
6-8 dashes of hot sauce

Heat olive oil on medium heat; lightly saute the garlic and half of the diced red onion until translucent (watch the garlic to make sure it doesn't burn). Add the ground beef, Worcestershire sauce, a pinch of the chili powder, and season liberally with salt and pepper. Cook until the beef is browned. In a separate pot (a large stockpot works best), add the beans, tomatoes, peppers, the remaining half of the diced red onion, chili powder, garlic powder, cumin, oregano, basil, and hot sauce. Bring to a boil on medium heat, then add the ground beef mixture, turning the heat down to medium-low. Simmer until heated and flavors meld (at least 1 hour). Adjust heat level with hot sauce and chili powder. Season with salt and pepper to taste.

If you're a fan of heat, there are various ways to "up the ante" on this recipe. You can add the seeds and membranes of the peppers, which carries the majority of the heat. Or you can increase the amount of chili powder/hot sauce (I like to use a combination of Tabasco and Texas Pete in this chili). Or, if you're feeling extra spicy, go ahead and throw a diced habanero in with the other peppers. This is one of the hottest peppers around, so if you go for this, be extra, extra careful to avoid touching any part of your face while handling a habanero, or the oils from the pepper will cause an extremely painful reaction (especially around the eye area). Using latex gloves is your best bet when dicing this fiery little bonnet (it's often called a Scotch bonnet), but if you don't have any around, just make sure you thoroughly wash your hands afterwards.

I like to top chili with sour cream and shredded cheese, which helps cut the heat. A piece of sourdough bread goes great with this. Best of all, this chili is the type that tastes even better the next day. Enjoy!

Monday, January 18, 2010

Chicken with Roasted Grapes and Shallots

Normally, I don't toot my own horn when it comes to cooking. But tonight...well, this meal (Chicken with Roasted Grapes and Shallots and Cheesy Chive Mashed Potatoes) was freakin' awesome. I've found, over time, that the simpler the ingredients, the better. And this dinner couldn't have been easier to pull together--from start to finish, including roasting time, it took about an hour and 20 minutes.

My husband came home the other day from an oil change with a ripped recipe from Bon Appetit magazine (apparently our neighborhood car maintenance place has a love of gourmet cooking). This was the recipe:
http://www.bonappetit.com/recipes/quick-recipes/2009/12/chicken_with_roasted_grapes_and_shallot

Roast chicken is one of those things where, the more you fix it, the more you develop a kind of sixth sense for timing it so it's perfectly done and juicy. You also develop a sense of how much seasoning to use. For this recipe, using a whole chicken as recommended is really the best way to go. If you're squeamish about dealing with a whole chicken, well, the most I can say is to just get over it and go for it. If you can find a chicken with its giblets neatly tied in a bag for easy removal, go for that. But if you can deal with it, I've actually found a chicken with its giblets still loose but easily removable by hand tastes better and has a tendency to produce a tastier roast. No matter your choice, remove the giblets and give the chicken a quick rinse under cold water, including a rinse of the cavity (that big gaping hole near the chicken legs, in case you're not familiar with the anatomy of a chicken). Make sure you dry the chicken well, blotting all over with paper towels (yes, even in the cavity). This recipe gives a vague direction to rub the chicken with a tablespoon of olive oil, which you'll want to do, but go an extra step and lift the skin around the breast area and rub some oil under there as well--it makes an extra crispy skin later on. Just try not to tear the skin covering the breast meat--you'll want to loosen it where it naturally pulls away from the neck area and go from there. Remember to season liberally--chicken is naturally a little bland, but it's amazing what the right amount of salt and pepper can do for the taste, plus that salt will lock in the juices in the chicken, an integral part of roasting.


(This was prior to roasting--I loved the bright colors of the grapes.)

I followed the timing on the recipe, and it was the perfect length of roasting time (one hour and 10 minutes). If you don't have one, invest in a good meat thermometer to avoid the unpleasantness of having to cut into a perfectly roasted chicken to make sure it's done. I say unpleasant, because doing so will just deplete the chicken of all of those extra juices, and nothing is more unappetizing than a dry chicken. It's essential to let the chicken rest for those 10 minutes as listed in the recipe--the chicken will continue cooking those few extra minutes, and the juices will be perfection once you cut into the meat. If you're not sure how to properly carve a chicken, there are myriad videos available to show you how. But the best resource I've found is in the first volume of "Mastering the Art of French Cooking" by (of course) Julia Child. Whatever method you settle upon, however, it's important you have a very sharp knife in order to efficiently cut through the bones.

About 30 minutes into the chicken cooking time, I started the mashed potatoes. I've never really made mashed potatoes a staple in the house, because they tend to end up dry, under-seasoned and underwhelming. But I thought I would give it another shot anyway. I started with some salted boiling water in a large saucepan. I added into the boiling water six Yukon gold potatoes cut into 1" cubes, adding additional salt. I highly recommend Yukon gold potatoes because they have a very buttery consistency. You can use new potatoes or russet if you have those on hand, but I don't think the taste yields the same result. I rapidly boiled the potatoes for about 30 minutes, or until a fork inserted into a cube literally tore the cube apart. I drained and put them into a large bowl, seasoned more with salt and pepper to taste, and used a masher to, obviously, mash the potatoes. I left the skin on the potatoes because I think the texture is better, but it's your call. I mashed to a very smooth consistency, then added just about every dairy product I could find in our refrigerator. That meant some buttermilk, a few dollops of sour cream, regular milk, Gruyere cheese, and (I think this was the key) the bechamel sauce leftover from last night's meal. I also added some chopped chives. The result? I think my husband said it all when he took one bite and his eyes rolled into the back of his head. He called them the "best mashed potatoes he's ever had."
And I kind of totally agree.


The result of tonight's work:

Sunday, January 17, 2010

Steak Dinner

Tonight's menu started out as fairly simple until I, as usual, decided to made it a touch more complicated. But it all worked out for the best.
The menu? Ribeye, Baked Yams, Steamed Broccoli, and Salad.


http://www.foodnetwork.com/recipes/mario-batali/bechamel-sauce-recipe/index.html

The "complicated" part came when I decided to make a bechamel sauce to accompany the broccoli. The following link to a recipe on Food Network is a relatively simple sauce, one which I have avoided making for years because it required heated milk, which always scares me a little. But I decided to go for it, and with a lot of oversight to ensure no burnt milk, it turned out beautifully. So if you have any reservations about making something in the kitchen, just try it out. If it doesn't work, you can just dump it and pretend it never happened.

The yam, with several holes poked in it to speed up the cooking time, was just wrapped in aluminum and popped into a 325-degree preheated oven. The great thing about yams and sweet potatoes is that, if you pop them into a microwave for about five minutes prior to putting them in the oven, you can let them go as long as you need, and they will be perfectly done every time.

The salad was leftover from last night, and it's a side we just normally have on hand. The broccoli was steamed in a fancy new piece of kitchen equipment we received during Christmas. If you don't have a steamer basket, you can just pop some fresh broccoli florets into salted boiling water and test the doneness with a fork.

Now the best part: the steak. For several years (roughly three), I made the choice to be a semi-vegetarian, meaning I ate chicken and seafood but no red meat or pork. It was more of a health choice than anything, but I realized within the last year of this experience that I was actually eating worse and felt tired and depleted most of the time. So, within a few months of dating my now husband, I decided I needed red meat back in my diet. And I will never forget that first taste of red meat, specifically a steak, that he fixed me in his apartment. Prior to my semi-vegetarian years, I always ordered steak or hamburgers medium well. That night, he fixed a medium rare steak, and it was like butter. I realized grilling or cooking red meat to any other temperature was practically blasphemous. I know to each his own, but I'm always a little offended now when someone orders red meat and practically screams, "No pink! Make sure it's well done!" It's like the cow just died in vain. Next time, if you're feeling a little adventurous, try a cut of red meat medium, or even medium rare if you're feeling spunky (unless you don't trust the restaurant to cook it correctly, in which case you probably shouldn't be dining there anyway). I can't guarantee you'll fall in love with a rarer temperature, but at least you will be trying something different. As to our preferred manner of grilling steak, I think we're more "steak purists," meaning we find just a simple seasoning of salt and pepper to be sufficient. And a grill pan is a great investment if you want to grill indoors during the winter--in fact, our grill plan has replaced the actual grill on our deck since it's an easy clean-up and you can control the heat better.

It's a rare occurrence in this house, but dessert followed in the form of a Mixed Berry Cobbler. I'm kind of a cobbler snob, and I was especially wary of this "healthier" version, but it's a terrific alternative. I switched out the frozen mixed berries for fresh ones just because I find fresh much, much better than the frozen version:

http://www.foodnetwork.com/recipes/healthy-appetite-with-ellie-krieger-/mixed-berry-cobbler-recipe/index.html

To top the cobbler, I made a homemade whipped cream, which is tremendously easy and tastes much better than the standard tub of Cool Whip. Starting with one cup of heavy whipping cream, beat until soft peaks are formed (meaning that, when you dip a whisk into the cream, a peak forms at the end and holds in place for several seconds and is thicker than when started; be sure to keep a close eye on this process, though, as you can move from whipped cream into butter within a matter of minutes). Next, add 2 Tbsp. sugar and any other spice of your choice (I chose ground ginger and cinnamon for tonight) and beat until soft peaks form again. The key to a great whipped cream is chilling the heavy whipping cream and even the equipment beforehand. If you have a standing mixer (another terrific kitchen gadget investment that significantly cuts down the time it takes to beat the cream by hand), pop the bowl and whisk attachment into the refrigerator for 15 minutes then proceed.

Saturday, January 16, 2010

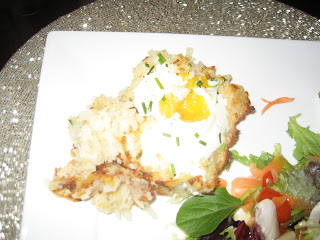
Rosti Casserole with Baked Eggs

I posted earlier this week that I was excited about last night's dinner, but it had to be pushed back to tonight since the hubby went off to play poker and I opted for a calzone from Amelia's, one of the best restaurants in the New River Valley. I would have taken a pic of the goodness that is their baby calzone (although "baby" amounts to the size of my head), but...well, I got really excited and scarfed it down.

So, tonight's menu was Rosti Casserole with Baked Eggs and a Mixed Green Salad with Vinaigrette. This made for a great, comforting (and very filling) casserole. You can pull the main dish from the Cooking Light website:
http://find.myrecipes.com/recipes/recipefinder.dyn?action=displayRecipe&recipe_id=1949711


We halved the recipe, and it was more than enough for two people. (By the way, this recipe was even given the special acknowledgment from my husband that it didn't need any Tabasco sauce.) If you try out the casserole, keep an eye on the egg portion of the recipe. Just a few extra minutes and you will end up overcooking the yolk, which isn't necessarily bad (we found that out tonight), but a runny middle would have been better. I originally went for 9 minutes once the eggs were added, then upped that by 3 minutes, which turned out to be too much. The original time of 9 minutes probably would have been perfect.

The mixed green salad was just a bagged mix with halved cherry tomatoes and peeled carrots. The vinaigrette was just a quick mix of tarragon vinegar, apple cider vinegar, sugar, salt, pepper, and olive oil. I would suggest just tasting along the way and using any combination of vinegar and olive oil you like.


Tomorrow night: steaks, and a short thesis on the horrors of watching someone order any kind of red meat medium well or (gulp) well done.

Wednesday, January 13, 2010

Pork Chops with Red Pepper Jelly

Every once in a while, my husband decides to help make a meal outside of his usual grilling and/or smoking meats (my mom reads this, so don't insert your "That's what she said" here). Tonight he made a guest appearance in the kitchen to make the main part of tonight's meal, Pork Chops with Red Pepper Jelly. A "Southern Living" recipe, this was a great, relatively quick weeknight meal and was surprisingly sweet and savory, not packed with heat as I originally expected:

http://find.myrecipes.com/recipes/recipefinder.dyn?action=displayRecipe&recipe_id=1951499

Don't worry if you can't find bone-in pork loins for this; we used thicker boneless pork chops instead. You will just have to adjust the cooking time based on the cut of pork you choose to use.


For sides, we fixed a Spanish Potato Salad (from the now well used Tabasco cookbook) and Green Beans with Caramelized Onions. (By the way, those are definitely, definitely caramelized onions, not "Oh shit I've burned the onions.")

Spanish Potato Salad
1 lb. new potatoes, scrubbed
1/4 c. sliced celery
1 medium red onion, thinly sliced
1/4 c. mayonnaise
1/4 c. Greek or plain yogurt
2 Tbsp. orange juice
1/2 tsp. Tabasco
1/2 tsp. salt
Fill a medium saucepan with 1/2 inch of salted water and bring to a boil. Add the potatoes, cover, and cook until done, about 30 minutes. Drain, cool, and cut into 1/4-inch slices. (To speed up the cooling process, just run the potatoes under cold water for a few minutes until they're easy to handle.)

Chill the potatoes, celery, and onion until ready to serve. For the dressing, beat together the mayo, yogurt, orange juice, Tabasco, and salt in a small bowl. Toss the potato salad with the dressing (use as much or as little as you wish) just before bringing it to the table.


Green Beans with Onions
Heat a tablespoon or so of olive oil and a pat of butter on medium heat; add about a cup of chopped onions and let cook until transparent (usually takes about 8-10 minutes). Add the green beans, salt to taste, pepper, and saute. I like a bite to green beans and a bright green color, so I usually saute this about 10 minutes.

Tomorrow night: leftovers. But I'm super excited about Friday's meal, so stay tuned! In the meantime:


Just look at that enthusiasm for cooking!

Monday, January 11, 2010

Roast Chicken with Balsamic Bell Peppers

I normally set aside a free weekend for the penultimate roast chicken, a recipe dog-eared and splattered with butter from "Mastering the Art of French Cooking: Vol. 1." But for a quick weeknight meal, this Roast Chicken with Balsamic Bell Peppers passed the test.

http://find.myrecipes.com/recipes/recipefinder.dyn?action=displayRecipe&recipe_id=1949749


The only "tweak" I made was more salt to the spice rub on the chicken. I find chicken to be bland most of the time, and it's not my favorite meat to use for dinner, so it's important to add enough seasoning from the start. While not a fan of fennel at all times, it blended well in this recipe, and the anise flavor was not as overpowering as I've found it to be.

As a side I served Honey-Glazed Carrots, a Tabasco cookbook recipe (I think I'm borderline OCD, so when I find a cookbook that offers reliable recipes, I continuously pull from those):
1 lb. carrots, peeled and thinly sliced
1/4 c. golden raisins (I omitted this, but if golden raisins are your thing, go for it)
2 Tbsp. butter or margarine
3 Tbsp. honey
1 Tbsp. fresh lemon juice
1/4 tsp. ground ginger
1/4 tsp. Tabasco
Preheat oven to 375 degrees. In a medium saucepan cook the carrots in 1/2 inches of boiling water, covered, over medium heat for 8 minutes. Drain the carrots, then turn into a 1-quart baking dish. Stir in the raisins, butter, honey, lemon juice, ginger, and Tabasco. Bake, uncovered, for 25 to 30 minutes; stir occasionally until the carrots are glazed. Spoon into a serving bowl.

Alongside the chicken and carrots I served leftover lima beans from last night's dinner and a crusty bread.


Tomorrow night is dinner out and a movie with some close friends, so look for more on Wednesday!

Sunday, January 10, 2010

A (Mini) Southern Fish Fry

If you take a look at all of the items on tonight's menu, you may wonder about the "mini" description. It's only because I grew up attending fish fries hosted by my grandparents, which fell after Christmas and before their annual trip to Florida for the winter. They no longer take the trips, but the fish fry has become a family tradition and includes fried oysters, fried scallops, fried white fish of any kind caught by my grandfather and friends, shrimp cocktail, scalloped potatoes, cole slaw, bread, green beans, homemade pickles, and a bevy of desserts. So, by comparison, tonight's meal seemed, well, smaller.

If you choose to replicate this menu, just keep in mind a few things: the remoulade and fish need some time to chill in the refrigerator, so plan to do some prep work at least two hours in advance. Also, it may seem like a lot of individual parts, but once cooking actually began, I had everything plated and on the table within 50 minutes.

The Menu:
Parmesan-Pecan Fried Catfish with Remoulade Sauce
Garlic-Roasted Potatoes
Garlic-Infused Lima Beans


I started with a remoulade sauce I pulled from a Tabasco cookbook I bought the hubby for Christmas. (The cookbook accompanied his personalized bottle of the red pepper sauce, so yeah, we're fans.) This type of mustard-based sauce is great as a condiment to any fried fish.

Remoulade Sauce
1/4 c. spicy coarse-ground mustard
2 tsp. paprika
1 tsp. Tabasco
1 tsp. salt
1/2 tsp. freshly ground black pepper
1/4 c. tarragon vinegar
1 c. olive oil
1/2 c. coarsely chopped green onions
1/2 c. finely chopped celery
In a medium bowl, whisk together the mustard, paprika, Tabasco, salt, and pepper. Beat in the vinegar and then, whisking constantly, add the oil in a slow, thin stream, continuing to beat until the sauce is thick and smooth. Stir in the green onions and celery and mix well. Cover the bowl and let stand for at least 2 hours before serving.

Next I prepped the Parmesan-pecan fried catfish, using 1.5 pounds of catfish cut into one-inch thick strips, dropping the strips into a large Ziploc bag and pouring in 1 cup of buttermilk (or place both ingredients in a shallow pan and cover with plastic wrap). I then let the fish sit in the refrigerator for one hour.

We moved on to an appetizer next, something we rarely do, but having recently purchased some habanero jelly, I decided to spread a layer of softened cream cheese on a plate and top it with the jelly, serving with Triscuits. If you like heat, habanero jelly is a great addition to your pantry.


After appetizers and before pulling out the fish, I prepped the garlic-roasted potatoes, another recipe pulled from the Tabasco cookbook:
2 russet potatoes, cut into one-inch cubes and blotted with a paper towel to remove excess water
1-2 tbsp. olive oil
1-2 garlic cloves, thinly sliced
salt to taste
1 tsp. Tabasco
Preheat the oven to 400 degrees. Toss together all ingredients and place in a large roasting pan (or a lightly greased baking sheet could also be used). Roast for 30 minutes, stirring once halfway through cooking time. (Potatoes are finished when a fork easily pierces through a test potato.)

At the same time I started roasting the potatoes, I heated the vegetable oil in a Dutch oven (a cast iron skillet can also be used), pouring oil to a depth of 1.5 inches and heating to 350 degrees. (If you do not have a cooking thermometer, you can test the heat level by adding a few drops of water to the oil; if it spatters, then the oil is ready.) While waiting for the oil to heat, I removed the catfish from the buttermilk, discarding the latter. For the coating, I used:
2 eggs, lightly beaten
Pecan Mixture (following ingredients were stirred together in a shallow bowl):
1 c. ground pecans
2/3 c. plain yellow cornmeal (if you have self-rising yellow cornmeal mix, it works just as well)
2/3 c. grated Parmesan cheese
1 Tbsp. Cajun seasoning
1 Tbsp. paprika
Dip the fish in eggs and dredge in the pecan mixture, shaking off any excess. Place the strips on a baking sheet lined with parchment paper or aluminum foil and set aside until you're ready to start frying the fish. (Note: you can add salt if you feel it is necessary, but it's really not thanks to the natural saltiness of the Parmesan and the Cajun seasoning.)

Prior to the 15-minute halfway roasting point on the potatoes, I added 10 oz. frozen lima beans, 1 c. water, 2 tsp. minced garlic, 1 Tbsp. olive oil, and salt to taste to a sauce pan and started cooking on medium, covering for the duration of cooking time. Just keep an eye on the beans to make sure there is adequate water in the pan.

After checking and stirring the potatoes and returning to the oven for their remaining 15 minutes, I dropped into the Dutch oven the coated catfish, frying in batches for 2-3 minutes. It's important to avoid overcrowding the Dutch oven (or cast iron skillet)--if you try to stuff in as many pieces as you can, it results in a significant drop in the frying temperature, which means uneven frying and a much less appetizing crust. Catfish fries quickly, but if you're worried about the "doneness" of the fish, just insert a fork, and the meat should easily flake. If not, just drop back into the oil for a few more minutes.

After all of the catfish strips are fried, the lima beans and potatoes should be finished as well. Just plate up with the remoulade as a dipping sauce and serve.


To finish our evening, we split a lemon cupcake we purchased from a cupcake bakery in Roanoke. At some point, I'll try to replicate this, but for now, I'll take the break from cooking tonight!

Friday, January 8, 2010

Stir Fry

Stir fry has been a meal the hubby and I have avoided for various reasons, though the top reason is that many homemade versions encountered during our single years have been drenched in soy sauce or teriyaki sauce or a combination of the two. Thus, it has just been salty sauce with some vague chicken/veggie texture. But, being the adventurous little cookers we are, I decided to finally put aside my fears and go for it.


I started by marinating thawed chicken breasts with a bit of everything I could get my hands on in my pantry/refrigerator, including: soy sauce, teriyaki sauce, rice vinegar, brown sugar, honey, ground ginger, a few dashes of Tabasco, and sesame oil. I literally threw all of the ingredients together, tasting along the way, so you will just have to trust your instincts and personal taste to figure out what proportions work best for you. After seasoning the chicken breasts with salt and pepper, I let the meat and marinade "enjoy" each other for about 6 hours in the fridge.

If you want to prepare the accompanying veggies ahead of time, just julienne some carrots, toss in some fresh broccoli florets, chopped bok choy, and sliced mushrooms, and any other vegetables you choose.

After appropriate marinade time, I sliced the chicken into thin strips to allow for quicker saute time. Heating a tablespoon or so of sesame oil in a wok, I added the chicken along with two minced cloves of garlic and sauteed on medium- to medium-high heat until no longer pink on the outside or inside. If you knock the heat up a bit during cooking time, the marinade ensures for a lovely golden crisp texture around the chicken. Be sure to monitor the heat to ensure that you do not burn the garlic, because as I can attest from a past experience, burned garlic will absolutely ruin your meal.

As the chicken cooks, bring two cups of jasmine rice (my favorite rice to use, but feel free to use whatever grain you wish) in one quart of water to a boil, then cover and drop the heat to low and simmer for 25-30 minutes. Meanwhile, drop the cooked chicken onto a plate and set aside. Heat another tablespoon or so of sesame oil in the same wok and add all of the veggies. Drizzle in 2 to 3 tablespoons of teriyaki sauce and add some rice vinegar and ground ginger (again, I just taste-tested along the way, so the amount used is up to you). Saute on medium-high heat for approximately 20 minutes. I prefer my veggies with a bite to them (al dente, if you will), but cook longer if you like a softer texture.

Return the chicken to the wok with the vegetables and cook until the chicken is sufficiently reheated. At this point, your rice should be fluffy and perfectly cooked. Just dish out the rice and top with the stir fry and serve.


I admit that I tried to whip up a shrimp sauce for our meal, that orangish/pinkish sauce served in most Japanese steakhouses. For years I have tried and tried recipes pulled from online, hoping that the one I found tonight receiving rave reviews could be "the one." Granted, it was the closest I've come yet to that inimitable taste, but it was still a far cry from restaurant quality. This particular recipe consisted of mayonnaise, paprika, melted butter, rice vinegar, garlic powder, and white sugar. But if any of you have found "the" shrimp sauce, please let me know, because it is a recipe search I would like to conclude!

Thursday, January 7, 2010

Cornbread Heaven

It's rare that I describe cornbread as "heaven." I've always found it dry, dense...just not that great. A pale comparison, if you will, to an ordinary piece of white bread. But then, through a roundabout way, I received the following recipe. It's beyond cornbread. I think I almost passed out from joy the first time I tried it. (Sadly, I'm not exaggerating about this--good food makes me indescribably happy.) Anyway, this is a versatile recipe. Serve it hot, cold, with butter, jam, honey, or apple butter, as a side to dinner or as breakfast. However you serve it, it's bound to become a staple in your recipe collection. And best of all, it really could not be easier. If you want to half the recipe (because this makes a ton of thick, gorgeous pieces), just pour it into an 8x8 or 9x9 greased dish. And yeah, as you can see, it's TOTALLY healthy.

"Beyond" Cornbread
6 eggs
2 sticks butter, melted
3 packages Jiffy corn muffin mix
16 oz. sour cream
2 -15.5 oz. cans cream of corn

Preheat oven to 350 degrees. Lightly beat eggs, then fold in remaining ingredients until well blended. Pour batter into a greased 9x13 pan and bake for 45-50 minutes (or until a toothpick inserted comes out clean).

Wednesday, January 6, 2010

Shrimp and Grits

Since tonight was just leftover white chili (just as tasty the second time around), I've decided to post one of our favorite recipes: shrimp and grits. We pulled this from a Southern Living Homestyle Cookbook. The first time we fixed it, we were literally speechless after our first bite. We have never varied from this recipe: it's perfection. We do add a little more heat, but that's such a subjective taste that it's best to start as-is, then bring some Tabasco sauce to the table if you feel like you need that heat. It also makes a difference to use block cheeses and shred them using a grater or a zester--the taste is even better if you choose to invest just a few extra minutes.

I have yet to find this version on the Southern Living website, but we are here to spread joy, so here goes:

Shrimp and Grits
makes 4 servings
prep time: 30 min.
cook time: 40 min.

2 c. water
1 (14 oz.) can chicken broth
3/4 c. half-and-half
3/4 tsp. salt
1 c. regular uncooked grits
3/4 c. (3 oz.) shredded Cheddar cheese
1/4 c. grated Parmesan cheese
2 Tbsp. butter
1/2 tsp. hot sauce
1/4 tsp. ground black (or white) pepper
3 bacon slices
1 lb. unpeeled, medium-size raw shrimp, peeled and deveined
1/4 tsp. black pepper
1/8 tsp. salt
1 c. sliced mushrooms
1/2 c. chopped green onions
2 garlic cloves, minced
2 Tbsp. all-purpose flour
2 Tbsp. fresh lemon juice
1/2 c. chicken broth
1/4 tsp. hot sauce

Bring first 4 ingredients to a boil in a medium saucepan; gradually whisk in grits. Reduce heat, and simmer, stirring occasionally, 10 minutes or until thickened. Add Cheddar cheese and next 4 ingredients. Keep warm.

Cook bacon in a large skillet until crisp; remove bacon, and drain on paper towels, reserving 1 Tbsp. drippings in skillet. Crumble bacon, and set aside.

Sprinkle shrimp with pepper and salt.

Saute mushrooms in hot drippings in skillet 5 minutes or until tender. Add green onions, and saute 2 minutes. Add shrimp and garlic, and saute 2 minutes or until shrimp turn pink. Whisk together flour and lemon juice until smooth. Add flour mixture, chicken broth, and hot sauce, and cook 2 more minutes until mixture is slightly thickened, stirring to loosen particles from bottom of skillet.

Serve shrimp mixture over hot cheese grits, and top with crumbled bacon.

I'm on my own for dinner tomorrow night, so probably no pictures, but I will be posting a cornbread recipe that gets a lot of compliments and has made the rounds among my friends. It's a great accompaniment to shrimp and grits, actually-if you need a side. Normally, we just split the main dish and indulge in culinary delight!

Tuesday, January 5, 2010

White Chili Chili Bang Bang

While the husband busied himself with gadgetry tonight, I redeemed myself from last night's lukewarm Chicken Spanakopita burgers. Tonight was white chili using a recipe from Food Network's "Healthy Appetite with Ellie Krieger":
http://www.foodnetwork.com/recipes/ellie-krieger/white-chili-recipe/index.html.

This was one of those recipes where we were literally licking our bowls clean. The only substitutions included more seasoning (I'm a firm believer in seasoning every layer of a dish) and I omitted the hominy, choosing to throw in a few tablespoons of flour instead to thicken up the broth (this is a very thin broth). It was a such a hit that my husband put aside the Tabasco sauce and ate it as is, a relatively huge accomplishment in our household. Don't overlook the lime and Greek yogurt at the end--it does add a delicious depth of flavor to the chili.

The chili was served with leftover "Greek salad" from last night's meal and a toasted kaiser roll.


For dessert, I sliced up a honeycrisp apple (the only apple in my book), added some chopped pistachios, and drizzled it all with honey. It appears the theme of tonight's meal was easy, healthy and tasty! It can be done!


On the menu tomorrow are leftovers, so look for some of our favorite recipes we have bookmarked in our plethora of cookbooks, including what we consider then end all, be all recipe for Shrimp and Grits!

And on a completely unrelated food topic:


SQUEEEEE!!! That is all.

Monday, January 4, 2010

No, Rachael Ray. No.

I'll preface this post by saying that I've never trusted Rachael Ray's recipes. I'm pretty sure her excessive smoking has limited her ability to taste her food. But I decided to give one of her recipes a shot tonight: Chicken Spanakopita Burgers. And while the result was edible, it definitely was not the best thing I've eaten. This would have been vastly approved if I had used beef or lamb--the texture of the chicken just did not work. It also needed to be seasoned much more beyond the oregano and grill seasoning. Just some helpful suggestions to keep in mind if you decide to try out this recipe. Also, I did not make the red pepper paste or the yogurt dip. Instead, I just sliced up some roasted red peppers and served as a topping, which cut down the prep time. Because Ms. Ray may claim "30 Minute Meals," but (earmuffs kids), she's full of s$&#. http://www.foodnetwork.com/recipes/rachael-ray/chicken-or-turkey-spanakopita-burgers-and-fries-with-yogurt-dip-recipe/index.html.


The fries pictured are super easy to make. Just slice russet potatoes into desired thickness. I usually run a paper towel across the slices because they have a high water content and end up a bit soggier if left as is. As counterintuitive as it may seem, I then drizzle with olive oil, which actually results in a crisp texture; salt; pepper; and any other seasoning around the house (I used Greek Seasoning for this batch). Bake at 425 degrees for 20 minutes, flipping halfway through cooking time. I made a quick alternative dipping sauce, and as much as I love ketchup, this worked out well for the fries: 1/4 c. plain Greek yogurt, squeeze of lemon juice, minced garlic, salt and pepper to taste blended together in food processor.

The side this time around included a Greek-style salad--the kind I'm pretty sure isn't authentic Greek cuisine, but it's called a Greek salad in a pizzeria. Just some shredded iceberg lettuce, diced plum tomatoes, and thinly sliced red onions. Olives and cucumbers could be added, but I'm not big on those, so the salad had to make do without tonight. The dressing was equally a cinch:
2 tbsp. olive oil
1.5 tbsp. lemon juice
1 tsp. oregano or Greek seasoning
salt to taste
Whisk ingredients together and drizzle over salad.


So to sum up: I will be trying Rachael Ray recipes with increased caution--about as much caution as I use to approach anything by Sandra Lee. Which is to say, I will just skip over those recipes and go for the Alton, Tyler, Nigella and Ina options instead. But to balance out my negative review, here is a dash of cuteness in the form of one of my little sous chefs.

Sunday, January 3, 2010

"What do you like to do?" "Eat!"

Yes, I'm pulling that title from "Julie & Julia." I have no idea if Julia Child ever said that, but it's fitting. I've always liked to eat, and as early as I can remember, I've always liked to cook. It's my therapy, my downtime. When I got married, I managed to find someone who shared my passion for food (although as a marathoner and a triathlon-er and a half-Iron Man-in-training, his food obsession shows much less noticeably than mine). Both of us have the luxury of an 8-to-5 job and no kids, so we may have more time for cooking than others, but we normally save our most "extravagant" meals for the weekends (extravagant meaning a Julia Child-inspired roast chicken, which requires literally standing by the stove to monitor it for 1.5 to 2 hours). Our Sundays usually consist of pulling out the myriad cookbooks stuffed in an ever shrinking cabinet space and planning out a week long menu while watching Food Network. I'm the classic recipe-follower, while my husband is normally in charge of the grilling and smoking of meats with some impromptu sauce he's concocted. We're not professional chefs, just a regular couple with a hobby of food.

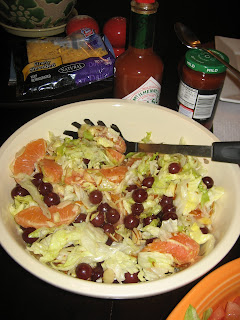
A New Year (and a new MacBook and a persistent husband) has prompted me to start this blog: our recipes, suggestions, menus and pictures of what we love to do the most. No recipe is definitive, just a place to start. With that, I'll start with tonight's menu: shrimp tacos with honey-glazed citrus salad.


Shrimp Tacos
Sprinkle one pound of shrimp (not pre-cooked, the kind you can just pop into a shrimp cocktail, but the almost translucent, fresh shrimp) with salt, pepper, cayenne pepper and fajita seasoning to taste. Drop into heated tablespoon of olive oil and cook until a bright, coral color. (Tip: never, ever overcook shrimp, because it can go from succulent to rubber in minutes, so monitor closely.) Serve with heated tortillas, diced tomatoes, lettuce, avocados, your choice of taco sauce (or an avocado-based dressing), and cheese. Tabasco sauce is ever-present on our table, so that's always a condiment staple in our house.


Honey-Glazed Citrus Salad
2 tbsp. each of honey, cider vinegar, and olive oil
2 oranges, peeled and sectioned
1/2 lb. grapes
2 c. shredded iceberg lettuce

Combine the honey, vinegar and oil and drizzle over remaining ingredients. Toss to coat. (Of course, you can substitute any citrus-based fruit you like). Optional: top with sliced almonds, walnuts, or chopped pistachios.


And that's supper. Normally we cook with leftovers in mind, but shrimp is not so great re-heated, so we figure one pound for the two of us. Granted, the menu isn't a normal southern winter menu, but having just returned from Charleston, SC, I was still craving seafood. And it's all much lighter than your usual heavy winter fare.

To top it off, I did choose a winter staple in my family: Hot Fruit Drink. This is usually too sweet for my husband, so it's normally all mine. You'll need a rather large, clean stock/soup pot for this one (one that has been thoroughly cleaned so no other taste infuses the drink). Or you can half the recipe--your choice.

64 oz. cranberry juice
46 oz. pineapple juice
1.5 c. brown sugar
1.5 c. water
3 sticks cinnamon
3 tsp. whole cloves

Combine all ingredients in a large pot and simmer for at least 30 minutes. Leftovers can usually last in the refrigerator for one to two weeks.


Look for much more--there is normally only one or two days out of the week when we don't cook something different. In the (very much real and immortal) words of Julia Child: bon appetit!